
4 Nail Art Designs That Literally Anyone Can Do
The best part of rocking an awesome manicure is hearing people say, 'wait, did you do that yourself?'


I’m the kind of person who always has their nails done. I never pay for manicures, and I constantly have people ask me how I got my nails to look so great! But my big secret is, while I’m great at painting my nails basic colours, I’m actually terrible at nail art. You wouldn’t know it, because I’m often rocking a nice gradient (my favourite, because they’re SO easy), or some other basic style. Here are five nail art designs that you can do if you’ve never picked up a striping brush in your life.
1. Polka Dots

Source: @majikbeenz (Instagram)
This is the first design I ever figured out how to do, because it’s so simple! You can buy a dotting tool online from a drugstore or make one yourself (using the back of a pushpin, bobby pin, or a toothpick if you want something smaller). Start off by painting all your nails one base colour, and then pour a tiny amount of your dot colour onto a piece of paper. Dip the dotting tool into the poured-out polish, and make polka dots on your nails as you wish! One thing that’s great about this is if you don’t have a lot of time, you can just add polka dots to one nail for a fun accent. You can get fancier with it too, using different sized dots or spacing them out in a fun pattern!
2. Gradient

Source: @nailsbyerin (Instagram)
Like I said, I love gradients because once you’ve gotten the hang of them (which won’t take long), they’re basically fool proof. You’ll need disposable makeup sponges for this (I get mine at the dollar store). One important thing for this one is you’re going to want to use two colours that are either both pretty dark or pretty light. If you use one very pale colour and one very dark colour, the dark one might overtake the light one. Start off by painting your nails the colour that you’ll want as your bottom colour. Then, sponge the top colour on. Start by sponging the top colour halfway down the nail, and then add a second coat sponging higher up, and so on. You’ll need to clean up the skin around your nails to remove all that nail polish! It’ll look bumpy, but once you add a top coat, it’ll smooth right out into a beautiful, shiny gradient!
3. Half Moon
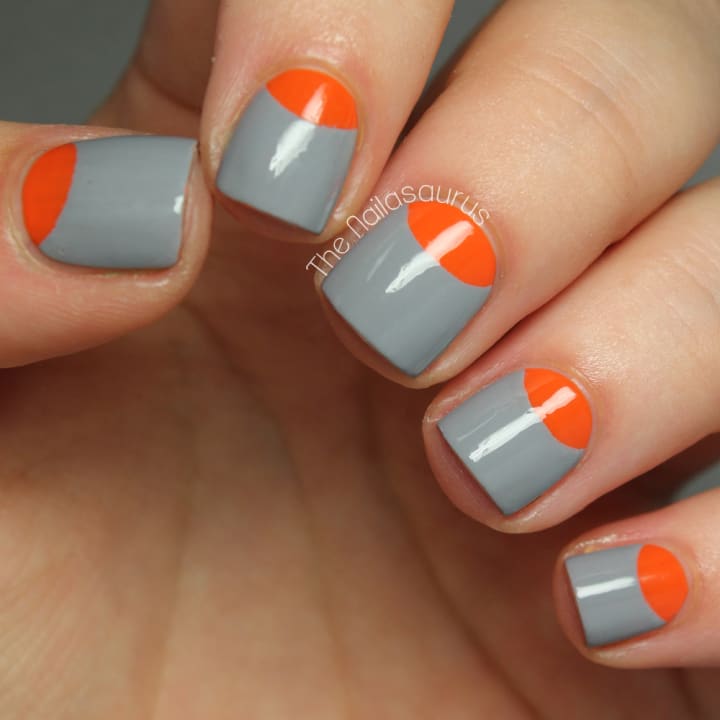
Source: thenailsaurus.com
These manicures are very easy and very popular. You’ll need hole-punch reinforcers for this (or you can purchase circular or half-circle nail vinyls). Pick the two colours you want to use. Start by painting all of your nails the colour that will form the bottom, moon-shaped part of the manicure. Add a quick-dry top coat, and wait for the manicure to dry COMPLETELY. I personally recommend waiting a few hours to be completely sure! Then, put the reinforcement stickers over the bottom part of your nail to form your half moon. Paint the top colour over the top part of your nail, and peel off the sticker while it’s still wet! I recommend using a lighter colour for the bottom part and a darker colour for the top part, so that the darker colour covers the bottom colour completely.
4. French Tip

Source: @nailsunderthesun (Instagram)
French tips look tricky and so fancy, but they’re actually super simple! You can buy French tip stencils at most drug stores, or even use scotch tape. Start by painting your nails a sheer, pinky-nude colour. Then, once it has COMPLETELY dried (again, a few hours might have to pass!), add the French tip stencil to the top part of the nail, outlining where the white part of your French tips will start. Paint the top part white, peel off the sticker while it’s still wet, and ta-da! Beautiful French tips. Add a top coat to seal it all up.
And there you have four designs that will help you impress everyone you know. The best part of rocking an awesome manicure is hearing people say, “wait, did you do that yourself?” There’s literally nothing better.
About the Creator
Em DiMonaco
Writing about whatever I want.
Keep reading
More stories from Em DiMonaco and writers in Blush and other communities.
7 Things Queen Elizabeth II and Anna Wintour Probably Talked About
In case you missed it, Queen Elizabeth and Anna Wintour are now best friends. Okay, fine, they’re two awesome women who have met on at least two occasions and then hung out at London Fashion Week, and we’re going to go ahead and call that best friends. I mean, Anna’s own daughter did:
By Em DiMonaco6 years ago in Geeks
to be successful when dating your girlfriend
To have a perfect date, first you need to determine a date time that suits the two of you. Therefore, you need to ask her about a suitable date and time, so you can set a time to meet, bringing a feeling of comfort to both parties. The first date always leaves a special feeling in the hearts of the people involved. Therefore, you should plan in detail to create an unforgettable impression in the beauty's heart. You don't necessarily have to spend a lot of money to hire a private band of musicians, or take her to luxurious and expensive places, just a romantic meal together at the park or something. It's so sweet that she's never done it before... Surely, she will always remember this impressive date. If you and she had a successful first date, continue planning the next date. Because this is necessary to let her understand that you are very interested in her. However, when showing interest, you should not show too much emotion because it can make her feel suffocated. Even if you and she have had interesting dates, that doesn't mean you should stop keeping in touch with her. This will make her think that you no longer care about her.Therefore, you need to continue to keep in touch to let her understand that you are still there and still care about her every day. Girls often don't like just listening to you talk about yourself without mentioning anything related to them. Because that proves that you are selfish and don't care about their thoughts. Therefore, you need to create a balance between questions and answers between the two of you throughout the conversation.You can ask questions about her life, hobbies, work... and share information with each other. During your daily conversations, you should keep in mind the likes and dislikes she has shared with you. If she mentions that she doesn't like seafood dishes, it's best not to date her at restaurants that specialize in seafood. Through this, she will know that you always listen and understand her.Chivalry and "gallantry" in behavior are always appreciated by girls in a man. Therefore, you should be polite, caring and do the best for the woman you want to create a long-term relationship with. Honesty and kindness are always good qualities that girls want in a boyfriend. Therefore, please respect, cherish and always help her when she needs you. There's nothing worse than when a girl thinks things are going well between them and you, but then you "disappear" without saying goodbye. This is the worst thing and unintentionally lowers your self-worth. Therefore, you should behave like a grown man.If you no longer have feelings for her then politely and gently tell her, give her that respect, because she deserves it Sometimes girls can feel uncertain about your feelings for them. Therefore, they would love to hear you remind and confirm your feelings for her once again.You don't have to repeat it 24/7 because it can make her feel bored and suffocated. But, if she doesn't listen to your reassurances, she may feel insecure about your feelings. Another bad thing that girls often encounter is not being able to predict a man's behavior. Therefore, you should not say one thing and do another, but always be consistent between your words and actions, that will make girls always respect you.
By Phàng Văn Duy3 days ago in Blush


Comments
There are no comments for this story
Be the first to respond and start the conversation.