
How to Install Synthetic Extensions (For Dreadlocks)
A How to Guide on Installing and Caring for Synthetic Dreadlock Extensions!


My dread journey at the time of writing this is merely nine months along. My dread babies are still maturing. They haven’t even begun to grow, and it could take another year before I see any natural length. This fact doesn’t really upset me though. Part of having dreadlocks is being patient and accepting things you can’t control. This is the biggest reason why I decided to dread my hair. I needed to practice more patience.
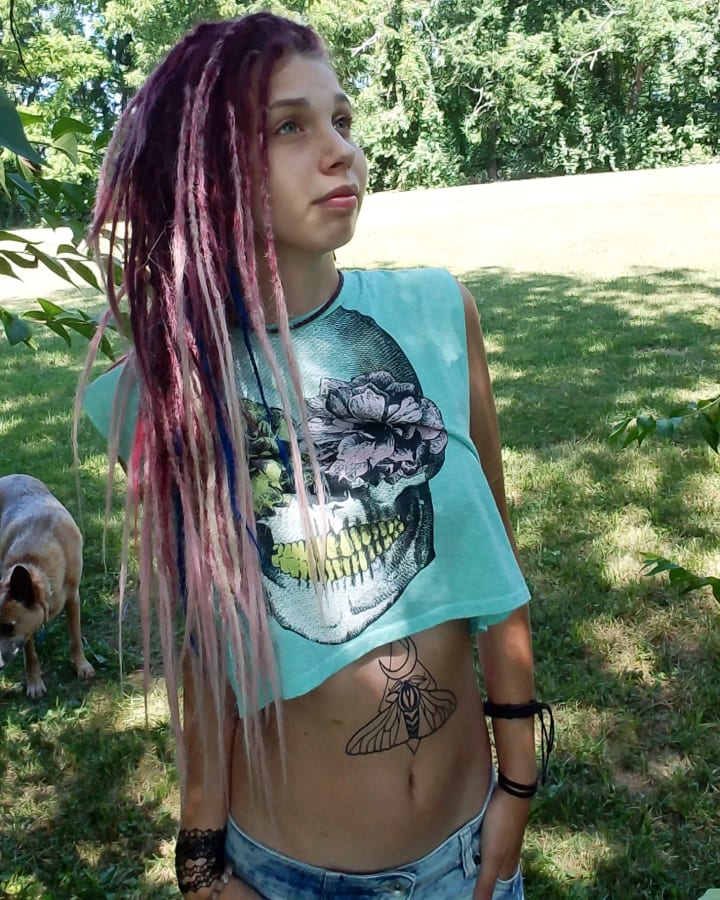
Installing synthetic extensions to my dreads wasn’t an impatient decision. I was thinking a bit more practically. Plus, I had the synthetic hair just lying around. Why let it go to waste? I really enjoy styling my hair and having a versatile base to create from. My hair can now sit a little looser, while still staying put where I want it. It’s all about the art I can make with my hair!
Not every dread-head feels the same excitement about extensions. I can understand feeling like one needs to “earn” the length purely from time. But the cool thing about dreads is how unique they are to each person. You might need a change, make some up-do’s a lot easier, or maybe you just think it looks cool! Either way, I want to share what I’ve learned and the process I used to attach the extensions. I hope this how to guide helps answer questions some of my fellow dreadies may have!
Materials
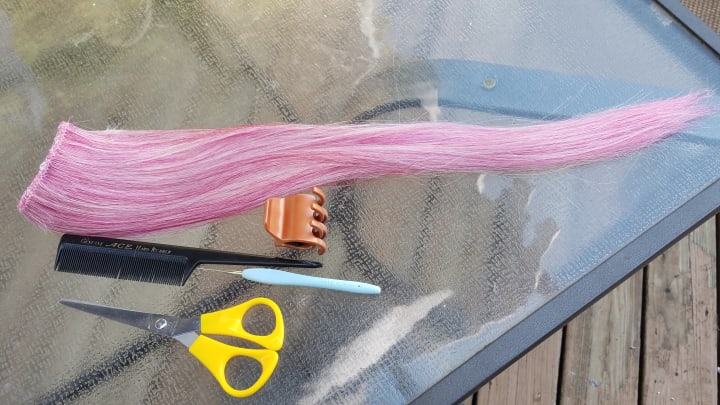
The synthetic hair I used, a clip for holding, comb, crochet hook, and scissors.
Dreadlock extensions vary from a few different kinds of materials. Popular extensions used are usually made from wool, synthetic hair, or 100 percent real human hair. Any of these extensions can be purchased online. I personally think Etsy has a great selection of dreadlock extensions. There are extensions that can be braided into natural, loose hair, but I won’t be going over those in this article. However, you can purchase Single Ended or Double Ended extensions to attach directly, similar to my own process. As long as they are synthetic or real human hair, you can cut the bases to make crocheting them in your own dreads possible.
For my own hair, I used synthetic hair extensions and a couple real human hair extensions. To install them, you’ll need:
- A small crochet hook (0.75mm or smaller)
- Scissors
- Small tooth comb
- An easy-to-clean work area
How to Install the Extensions
I’ll take you through the process I used to install each extension. To preface, each extension is directly crocheted into a single dread. I find crocheting them in is the most secure way. I did also attempt to dye my synthetics, so they are a pink/red-violet shade to match my current hair color. These steps are a good basis for installing extensions, but I’d like to clarify that I used loose hair extensions and turned them into dreads. The instructions below include how I sectioned the hair and then dreaded them once they were attached. Assuming you have the materials and you’re ready to install, here’s how you do it:
Section your extension.

Less is more!
Step 1. Section the loose hair to the amount needed for the specific dread. To estimate the thickness, compare your section to the middle of your dread. (Assuming your dreads taper a bit. They may not, which means you can compare closer to the end.)
Prepping Your Extension

Backcomb your section for easier handling.
2. Using your comb, backcomb the hair a bit and palm roll until the section has about an inch or two of “dreaded” hair. This is simply to make holding and installing the section easier. I found I lost quite a bit of loose hair from the extension if I did not backcomb before attaching. You don’t need to make it perfectly dreaded, as the the loose hairs are what you’re using to attach the extension.
3. Use your scissors to then cut off the section, and firmly hold the section at it’s base.
Crocheting the Extension to Your Dread
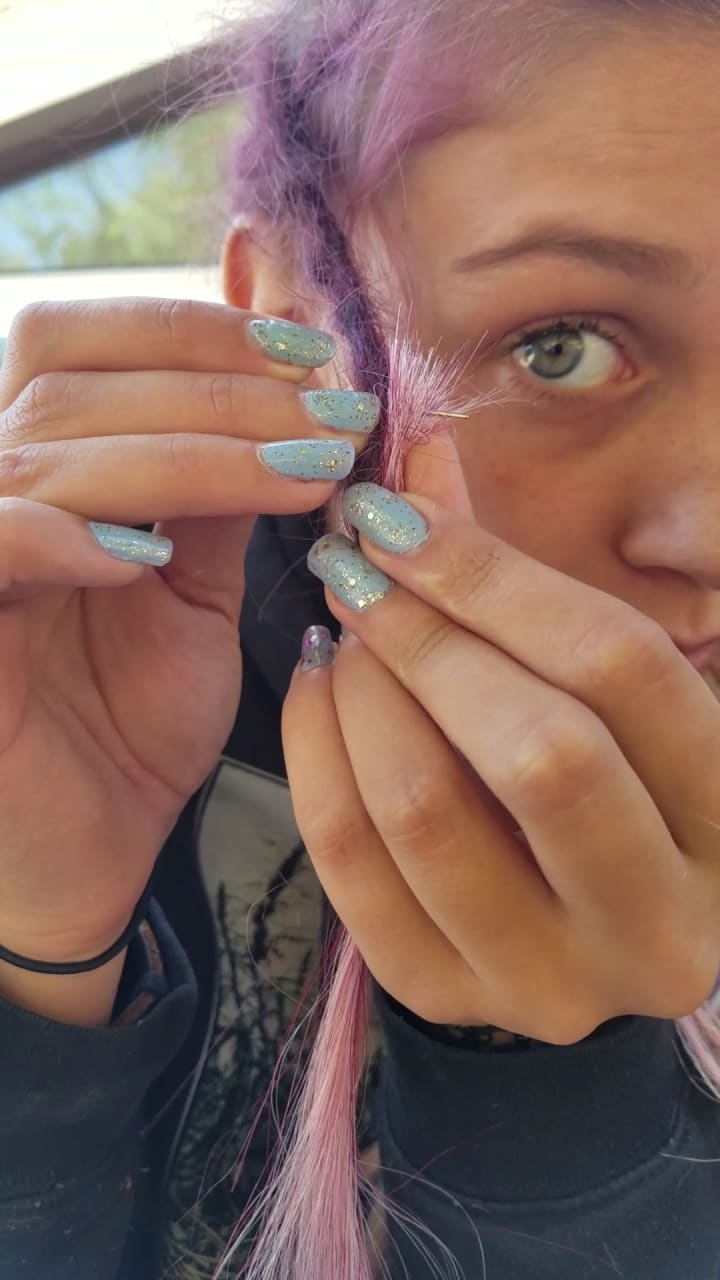
It's a lot easier than you think! Snag the hair with the hook, and pull through!
4. This is the fun/tricky part: Depending on where (and if) your dread tapers, hold the section on one side of the dread where it is to be attached. Keep in mind it may be a bit thick at the first attachment spot, so ensure the thickness matches where you’re installing it.
5. Once you’ve found the right spot, it’s time to use the Crochet Hook! Stick the hook into your dread from the opposite side of where you’re holding the extension. (If this is your first time “crocheting” a dread, start SLOW) The aim is to pull the top hairs of the extension through your dreadlock. Use the tiny hook to grab some hair, pull through, and then repeat sticking the hook through, grab the hair, and then pull through... Don’t forget to slide the hook through at different angles because there’s only so much space in one spot! You can use your thumb to guide the hair and hook together, but be careful as it is easy to snag your thumb with the tiny hook.
6. Once you have most (hopefully all) of the top hairs pulled through, turn your dread over and pull the hairs down and back through. The idea here is to secure the extension by weaving the hair back and forth and throughout the dread itself.
7. Now that you have the initial top part of the extension attached, it’s time to wrap and crochet the rest of the extension! Continue to crochet the extension hair through your dread. If it is a different color (or you’re going for an ombre look) it helps to “wrap” the extension around your own dread. As you get past the “backcombed” part of your extension, you can move the loose hair around so it’s covering your own dread. Don’t be afraid to make it a little messy! The aim here is to flow your dread into the new extension. Wrapping the hair around your own dread, and then crocheting all around so ALL loose hairs are weaved in.
8. You’ll eventually be at the end of your own dreadlock with nothing left to weave through. Perfect! Now it’s time to turn that loose hanging hair into a dreadlock! Take your comb, backcomb your extension a bit, and then palm roll the crazy down. Repeat down the whole extension (or stop towards the end for a wispy look). Once the whole extension is backcombed, crochet the dread using the same method. Stick the hook in, snag the loose hair, pull through, and then repeat around the whole dread. (*I found that this process was easiest for the synthetic hair. Twist n Rip was a bit messy and I could see weak spots from the start. I highly suggest backcombing, quick palm roll, and then crocheting the whole extension.*)
9. And now you’re done! With one extension at least. Repeat the process above with each dread until you have your desired look.
Caring for Your Synthetic Dreadlocks
It can be a bit confusing to think that you can treat the synthetic hair like your own. But you totally can! Your new extensions can be washed, styled, and worn just like regular dreads.
As long as you’re using residue-free shampoo, your shower routine won’t be much different. You can use a blow-dryer on your extensions, but remember to keep it on the lowest heat setting. And don’t hold the heat on them too long. It is possible for the plastic to melt.
If you’re worried about them falling out, they really shouldn’t. Crochet them a bit at first to ensure there aren’t any weak/unattached spots. But once you have them solidly in your hair, let them be! They will dread up too with time and friction. You’ll always have the option to brush or cut them out if you’re really unsatisfied.
Pros and Cons
The biggest downfall to adding extensions would be the weight. They tend to get heavy when soaking wet. All the added volume can be tricky to get used to as well. I recommend staying away from wool if you have a sensitive scalp. The lightest and most comfortable extensions would be 100 percent real human hair.
Synthetic hair is basically plastic, so it can feel rough and scratchy. Especially when you first dread it up. There’s no quick fix for that, as plastic can’t absorb much of anything. However, over time and after you wash a couple times, you won’t even notice the difference. They’ll become a little softer and you’ll get used to the new hair. Extensions come with patience too! It does take a lot of time to crochet each individual extension in. But you could always ask a friend to help!
As for the pros, I think they’re so much fun! My hair is longer. I have a much easier time creating the styles I want. Plus, I get a lot of compliments! I got exactly what I wanted and now I don’t have to wait years for my hair to grow. It might be cheating a little, but it’s just hair!
I’ve really fallen in love with having dreadlocks. Since dreads are just like regular hair (except matted up), I can still change things up when I get inspired for a new look. I do try to leave my hair alone in between dying colors or adding accessories like extensions. It’s important to let your hair recover and strengthen up. Crocheting your dreads too often, or even hiding them in a bun every day can make them weak. Remember to be kind to your dreads. And above all, be patient!
If you'd like to stay updated, this is where I'll be posting mainly. Have a suggestion? Need something answered? Send me a message about topics you'd like to read about!
About the Creator
Kylie Jane
Dog Mom of Four. CCPDT-KA Dog Trainer.
Gratitude Blogging and sharing knowledge
Keep reading
More stories from Kylie Jane and writers in Blush and other communities.
Horror films and normal films
Horror films and normal films, while both belonging to the broader category of cinema, differ significantly in terms of their themes, tone, audience reactions, and cinematic techniques. Let's explore some of the key differences between horror films and normal films:
By WILLIAM DIAGO RODRIGUESa day ago in Blush


Comments
There are no comments for this story
Be the first to respond and start the conversation.